Zola: How to deploy a website using S3 Bucket and CloudFront
Deploying a Zola website on an S3 bucket via CloudFront can present some challenges, often due to misunderstandings about how CloudFront works. In this article, I share the configurations and strategies I used to make the Zola website fully functional with a CloutFront deployment. As we all do, the first thing I have done to deploy my Zola website using S3 Bucket and CloudFront is to follow the Zola documentation. And… once deployed, I find that the site doesn’t work as well as expected. I was faced with the following problems: In this article, I share the method I used to solve these problems. Let me know if there are simpler or more effective methods! When we access a sub-page of the website, it is not redirected to the This exemple provides the following code to create a CloudFront function: Once you created and deployed this function, you have to associate this function (which I’ve called I don’t yet deployed a multilingual website using Zola and this deployment method. But I think that we need to create a function and a behaviour for each language. The function for the french (fr) language should look like this: And the behaviour should capture the To be continued… When accessing non-existent pages or resources on a static website generated with Zola and hosted on an Amazon S3 bucket served through CloudFront, we encounter a 403 Forbidden error instead of the expected 404 Not Found error. This issue arises despite CloudFront having permissions to access existing objects. The S3 bucket has public access blocked to prevent direct access, ensuring that CloudFront is the only entry point for users. The 403 Forbidden error occurs because, with public access blocked, S3 does not differentiate between unauthorized access and non-existent resources for requests coming through CloudFront. Although this setup enhances security by restricting direct access, it inadvertently impacts the user experience by providing a misleading error message for missing content. Folowing the official AWS developer guide, we should have created an OAI (Origin Access Identity) for CloudFront to access the S3 bucket. This OAI is used to restrict access to the S3 bucket to only CloudFront. This is done by updating the bucket policy to allow access to the OAI. This policy should look like this: Where you have to replace To handle 404 errors correctly, we need to configure custom error pages in CloudFront. We can do this by following these steps: There is no need to configure the 404 error page in this way, as the 404 error will never be triggered. In fact, as we have seen, a non-existent resource triggers a 403 error, which is now tracked by the CloudFront distribution to return a 404 error. By default, CloudFront caches the resources it serves for 24 hours1. This means that when you update a file in the S3 bucket, the changes are not immediately visible on the website. To solve this problem, you can invalidate the CloudFront cache when the website is updated. And you can also add a versionning to the ressources (that allows to update and serve ressources in S3 bucket without invalidate all cache). If you use GitHub Action to deploy your website, the Zola documentation provides a way to invalidate the CloudFront cache when the website is updated. Here the deployment GitHub Action I use to deploy my website to S3 and invalidate the CloudFront cache: You can install the To avoid invalidating the entire CloudFront cache when updating a file in the S3 bucket, you can add versioning to resources. This is done by enabling versioning in the S3 bucket and adding a query string to the URL of the resource in the CloudFront distribution. To enable versioning in the S3 bucket, simply go to the S3 bucket properties and enable versioning. Once versioning has been activated, don’t forget to create a lifecycle rule to delete old versions of files. To do this, simply go to S3 bucket management and create a lifecycle rule. For example, you can create a rule to delete old versions of files after 5 days (that’s what I’ve set). To add a query string to the URL of the resource in the CloudFront distribution, you can use the Let’s be honest - deploying a simple blog using CloudFront is probably like using a sledgehammer to crack a nut. The dozen or so readers of my blog (hi sweety!) would have been perfectly happy with a simple static hosting solution. But hey, who am I to deny myself the pleasure of diving into AWS services under the pretense of “proper infrastructure”? In all seriousness, while this setup might be oversized for my current needs, exploring CloudFront’s capabilities beyond basic configuration has been an enlightening journey. If you’ve found yourself on a similar over-engineered adventure, or if you have any questions or suggestions, feel free to share your experiences in the comments below. When RTFM isn’t Enough 😉
index.html file. To solve this problem, I had to create a CloudFront function (it could have been a Lambda@Edge) to point directly to the index.html file.404.html error file is not working as expected. When I try to access a non-existent page, the 404.html file is not displayed but I get a 403 error instead. To solve this problem, I had to configure the error pages in the CloudFront distribution. 1. Redirecting to the file: CloudFront Function
index.html redirectionindex.html file. And if you’ve configured the 404.html error file as described below, you’ll get a 404 error instead of the expected page. CloudFront provides a root object parameter by default, but as its name suggests, it only works for the root of the website! Fortunately, CloudFront also provides a mechanism called CloudFront Functions that allows URLs to be automatically rewritten. To create a CloudFront function that correctly redirects to index.html files, you can follow the example provided by AWS:function handler(event) {
var request = event.request;
var uri = request.uri;
// Check whether the URI is missing a file name.
if (uri.endsWith('/')) {
request.uri += 'index.html';
}
// Check whether the URI is missing a file extension.
else if (!uri.includes('.')) {
request.uri += '/index.html';
}
return request;
}Rewrite_URL in this example) with the default Default (*) behaviour of the CloudFront distribution: 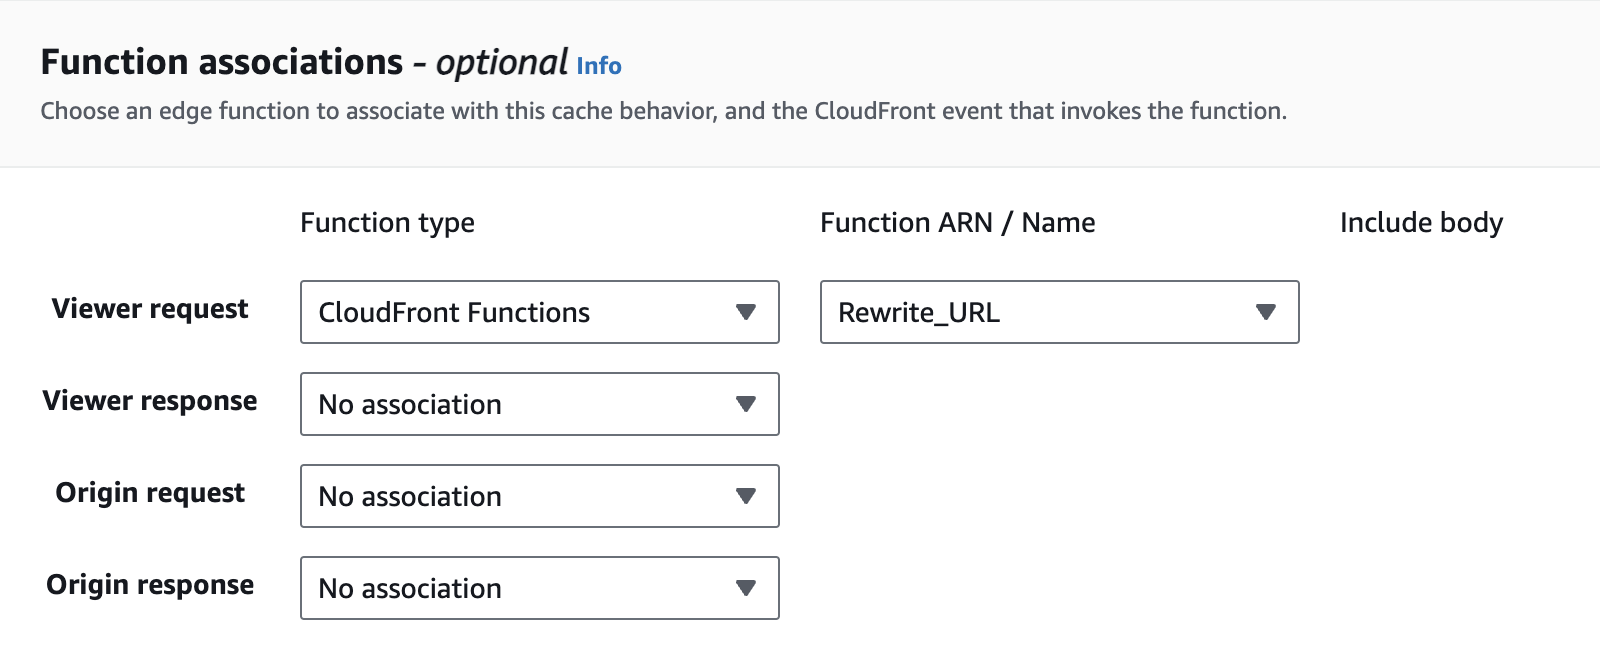
i18n redirection
function handler(event) {
var request = event.request;
var uri = request.uri;
if (uri.endsWith('/') && uri.startsWith('/fr/')) {
request.uri = uri + 'index.fr.html';
}
return request;
}/fr/* path model. 2. The Case of the Misleading Errors: 404 vs 403
Problem statement
Undelying cause
Solution: Configuring CloudFront and S3 for Correct Error Handling
Check OAI Access to S3 Bucket
{
"Version": "2012-10-17",
"Id": "PolicyForCloudFrontPrivateContent",
"Statement": [
{
"Sid": "1",
"Effect": "Allow",
"Principal": {
"AWS": "arn:aws:iam::cloudfront:user/CloudFront Origin Access Identity YOUR_OAI_ID"
},
"Action": "s3:GetObject",
"Resource": "arn:aws:s3:::yourbucketname/*"
}
]
}YOUR_OAI_ID with the OAI ID you created and yourbucketname with the name of your bucket. Configure custom Error Pages in CloudFront
3. The cache headache: managing content updates
Cache invalidation
GitHub Action
name: Build and Publish to AWS
on:
push:
branches:
- main
jobs:
run:
runs-on: ubuntu-latest
timeout-minutes: 10
steps:
- uses: actions/checkout@v4
with:
submodules: recursive
- uses: taiki-e/install-action@v2
with:
tool: zola@0.18.0
- name: Build
run: zola build
- uses: reggionick/s3-deploy@v4
env:
AWS_ACCESS_KEY_ID: ${{ secrets.AWS_ACCESS_KEY_ID }}
AWS_SECRET_ACCESS_KEY: ${{ secrets.AWS_SECRET_ACCESS_KEY }}
with:
folder: public
bucket: ${{ secrets.S3_BUCKET }}
private: true
bucket-region: us-east-1
# Use the next two only if you have created a CloudFront distribution
dist-id: ${{ secrets.CLOUDFRONT_DISTRIBUTION_ID }}
invalidation: /* Command line
aws command line tool using the taiki-e/install-action action and then use the aws cloudfront create-invalidation command to invalidate the CloudFront cache. The invalidation: /* parameter is used to invalidate the entire CloudFront cache.aws cloudfront create-invalidation --distribution-id YOUR_DISTRIBUTION_ID --paths "/*" Ressources versionning
S3 bucket versioning
CloudFront distribution configuration
Behavior tab of the CloudFront distribution. You can add a query string to the URL of the resource by adding a versionId query string to the Cache key and origin requests of the Default (*) behaviour.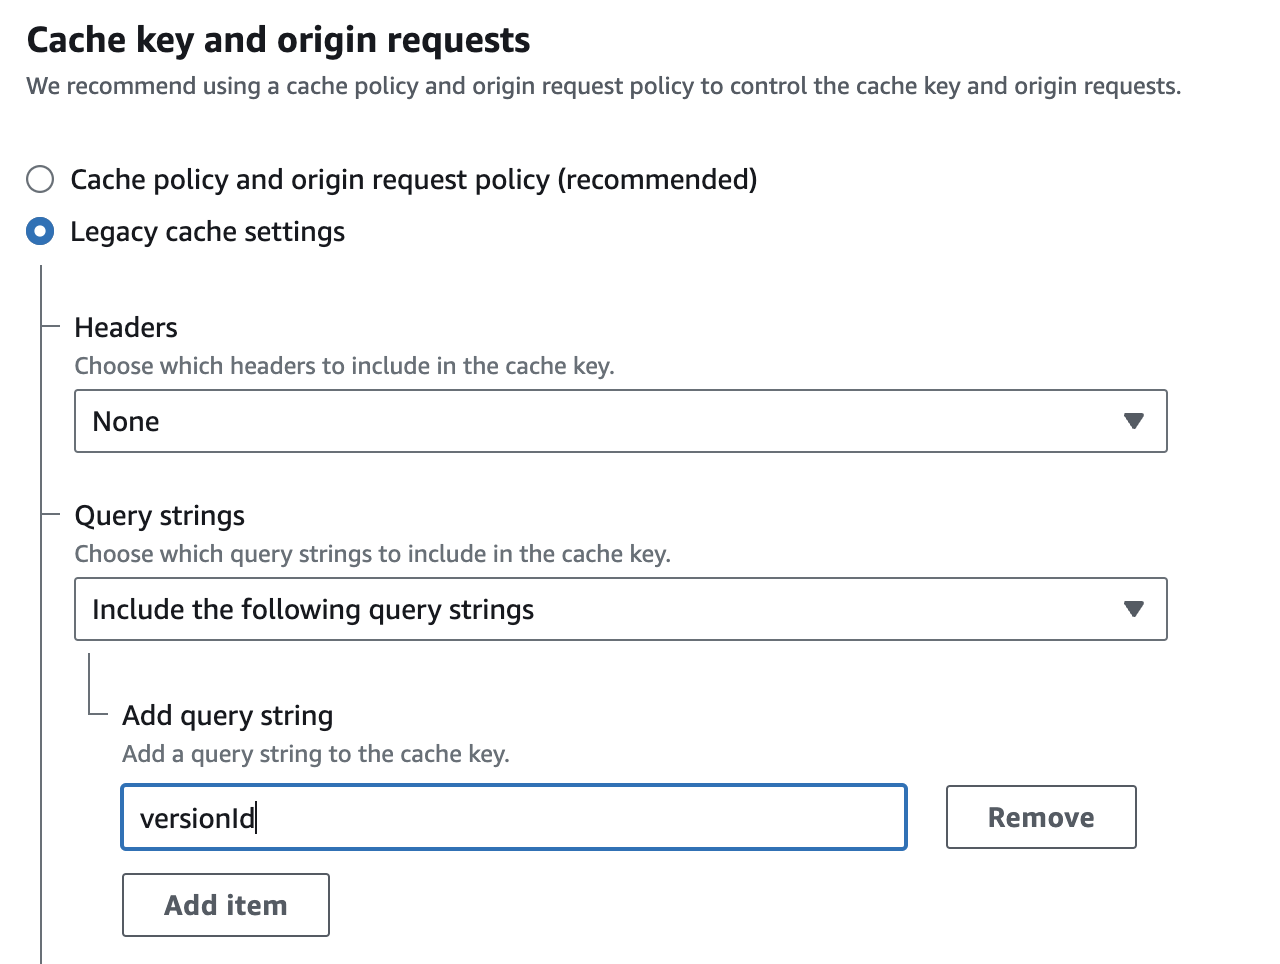
Overkill? Certainly, but worth the journey